Helping Hand from Chemistry, with a Glove: Luminol Synthesis from Waste
| Polish version is here |
The following article was originally published in the journal for educators Chemia w Szkole (eng. Chemistry in School) (5/2023):

Introduction
Chemistry, the science of the structure, composition, and transformations of matter, opens up a fascinating world of both the microscopic and macroscopic realms. It is a discipline that profoundly influences our daily lives, as its scope is incredibly broad, ranging from processes occurring in living organisms to those shaping the entire world around us. Education in chemistry is particularly effective when reinforced by hands-on experiments that allow students to experience chemical phenomena firsthand.
Why are experiments so crucial in chemistry education? The answer lies in the inherently abstract nature of chemistry, which can be difficult to grasp through theory alone. Experiments allow students to observe reactions with their own senses, understand the changes occurring, and see their consequences. It is through hands-on experimentation that students can experience the magic of chemistry and realize the powerful scientific tool at their disposal.
One of the most captivating aspects of chemistry experiments is chemiluminescence, reactions that produce light as a result of chemical transformations and create stunning effects in the dark. These reactions serve as an excellent educational tool for teachers, helping to engage students and spark their curiosity. For students, chemiluminescent reactions are not only mesmerizing but also provide an engaging way to explore abstract chemical concepts such as molecular energy transformations.
There are many substances with chemiluminescent properties, including the white allotrope of phosphorus P4, lucigenin C28H22N4O6, lophine C21H16N2, organomagnesium and organosilicon compounds, and many others [1] [2] [3] [4]. One of the most well-known substances of this kind is luminol, though it is not a particularly common chemical compound [5]. Interestingly, this fascinating substance can be synthesized using an unexpected raw material: discarded disposable gloves. The synthesis is a multi-step process, ultimately leading to the production of this chemiluminescent compound.
I invite the reader to replicate the described experiments. However, I must emphasize the need for caution, as this procedure involves working with hazardous substances, including corrosive and irritating chemicals (acids, bases, hydrogen peroxide), as well as toxic and highly reactive compounds. Proper personal protective equipment (PPE) is essential, and all safety guidelines provided in the text must be strictly followed.
Stage I – Obtaining Phthalic Anhydride
To begin the synthesis, we need to gather the following substances:
- Vinyl disposable gloves (100 pairs) – approximately 500 g (17.6 oz)
- Sodium hydroxide – 100 g (3.5 oz)
- Concentrated hydrochloric acid HCl(aq) – 250 cm3 (8.5 fl oz)
In this process, disposable vinyl gloves (Photo 1) serve as a reactant and a source material for producing the desired compound.

Although a large quantity of gloves is required due to the low concentration of the target precursor, they are relatively inexpensive. Furthermore, they do not have to be brand new; in this experiment, I used gloves that had been previously used for routine laboratory work and collected over time in a designated container. However, it is crucial to ensure that the gloves were not contaminated with highly toxic chemicals. Additionally, reusing waste materials in this way provides an educational perspective on sustainability and waste reduction.
Before use, the gloves were rinsed twice with water, dried, and cut into small pieces (Photo 2).

The large amount of required material makes it practical to process it in smaller portions. In my experiment, I used approximately 167 g (5.9 oz) of cut gloves per batch, placing them into a round-bottom flask and adding about 800 cm3 (27 fl oz) of isopropyl alcohol C3H7OH. The mixture was then heated under reflux for 2 hours (Photo 3). This process was repeated three times to process the full quantity.
I acknowledge that the amount of alcohol needed is substantial, but after each batch, the solvent can be distilled from the reaction mixture and reused.

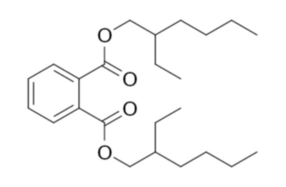
The plastic used in vinyl gloves is inherently hard and brittle. To make it flexible, manufacturers add various plasticizers. Conveniently, one of the most commonly used plasticizers is a phthalic acid ester, di(2-ethylhexyl) phthalate (DEHP) C24H38O4 (Figure 1) [6]. However, it should be noted that some gloves contain alternative plasticizers, including non-phthalate types, in which case another source material must be sought.
After the heating period, the reaction mixture is cooled, and the liquid phase containing the extracted plasticizer is separated, while the remaining solid plastic residue is discarded. The liquid is then mixed with about 33 g (1.2 oz) of sodium hydroxide dissolved in 800 cm3 (27 fl oz) of distilled water. At this stage, the solution often becomes noticeably turbid (Photo 4). The mixture is then heated under reflux for another hour.

At this stage, alkaline hydrolysis of the ester takes place. After cooling and allowing the mixture to settle, distinct phase separation occurs (Photo 5). The lower aqueous phase contains the target compound, while the upper alcohol layer holds reaction byproducts, including isopropanol, which can be recovered for reuse.

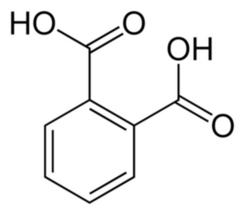
The lower aqueous phase is collected and acidified with 84 cm3 (2.8 fl oz) of concentrated hydrochloric acid, then cooled in a refrigerator. The addition of this strong acid causes white crystals of phthalic acid C8H6O4 to precipitate (Photo 6, Figure 2).

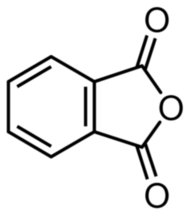
Unfortunately, the phthalic acid obtained in this manner is relatively impure. However, it can be easily purified. The solid substance is filtered, dried, and transferred to the bottom of a large, tall beaker, which is then covered with a round-bottom flask filled with cold water. Upon heating, the phthalic acid converts into its anhydride C8H4O3 (Figure 3).
At elevated temperatures, phthalic anhydride undergoes sublimation, then solidifies as solid crystals upon contact with the cold surface of the flask. This allows for the collection of highly pure, brilliant white crystals in the form of delicate needles (Photo 7).

I obtained 31.2 g (1.1 oz) of purified phthalic anhydride, which was used for further synthesis. The actual yield of the process is difficult to determine, as the initial concentration of the plasticizer in the gloves is unknown. However, the final product accounts for approximately 6.2% of the initial glove mass. While this is a relatively low yield, it is worth noting that the compound was obtained from waste materials using inexpensive and readily available reagents, making the process worthwhile.
Stage II – From Phthalic Anhydride to 3-Nitrophthalic Acid
In this step, our goal is to introduce a nitro (-NO2) group into the phthalic anhydride molecule and obtain the corresponding acid. To do this, place 30 g (1.1 oz) of dry phthalic anhydride in an Erlenmeyer flask, and while continuously stirring to prevent clumping, slowly add 28.5 cm3 (1 fl oz) of concentrated nitric acid (HNO3). Once the solid is fully dispersed in the liquid, begin the slow addition of 28.5 cm3 (1 fl oz) of concentrated sulfuric acid (H2SO4). This process is exothermic, so care must be taken to prevent uncontrolled boiling. During the acid addition, vigorous stirring is necessary, but be cautious to avoid splashing the corrosive liquid. Initially, no visible reaction occurs; the mixture simply remains a suspension of white crystalline material in acid (Photo 8).

The prepared mixture is placed in a hot water bath near 100°C (212°F). Fortunately, in this case, the nitration reaction proceeds relatively smoothly. However, safety precautions must still be followed. Within moments of heating, brown nitrogen oxides begin to evolve from the mixture (Photo 9). These gases are highly toxic, so the reaction must be conducted under a well-functioning fume hood or outdoors.

Molecular sieves in the water bath as potential boiling chips
Heating is maintained for 2 hours, after which the mixture is cooled and slowly poured into about 70 cm3 (2.4 fl oz) of distilled water. This is an exothermic process and continuous stirring is required! A precipitate of the reaction product forms at the bottom of the vessel (Photo 10).

It is worth noting that during the nitration of phthalic anhydride under these conditions, two isomers of nitrophthalic acid are formed: 3-nitrophthalic acid (Figure 4A) and 4-nitrophthalic acid (Figure 4B).
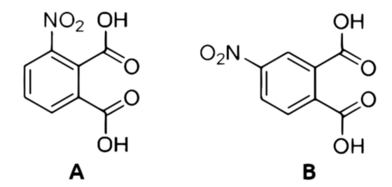
These isomers can be easily separated based on their differing solubilities: the 3-nitro isomer is much less soluble than the 4-nitro isomer, which is why the former precipitates from the solution as a solid. The precipitate is then washed multiple times with cold water, recrystallized in hot water, and dried. This process yields nearly pure 3-nitrophthalic acid as a white crystalline solid (Photo 11).

I obtained 13.2 g (0.5 oz) of the desired acid, giving a yield of approximately 31% based on the phthalic anhydride used. This yield is relatively low, primarily because the second product (4-nitrophthalic acid) was not isolated and accounted for some of the waste material.
Stage IIa – Synthesis of Hydrazine Sulfate
To convert phthalic acid into its hydrazide, it must be condensed with hydrazine (N2H4). This substance, also known as diazane, is an inorganic compound consisting of two connected amine (-NH2) groups. Hydrazine is highly toxic, colorless, flammable, corrosive, and hygroscopic, fuming in air. Its molecular structure has a large dipole moment, indicating that it primarily exists in the gauche conformation, where both amine groups are twisted by approximately 90–95° relative to the anti-conformation [7] [8].
The toxicity of hydrazine discourages direct handling or synthesis. Instead, we use its salt: hydrazine sulfate (or more accurately, hydrazine bisulfate, N2H6SO4). At room temperature, it is a white crystalline solid that is much easier and safer to handle than free hydrazine.
To synthesize hydrazine sulfate, we need:
- Sodium hypochlorite (NaClO, 5% aqueous solution) – 500 cm3 (17 fl oz)
- Sodium hydroxide (NaOH) – 32 g (1.1 oz)
- Urea (CH4N2O) – 22 g (0.8 oz)
- Gelatin – 0.75 g (0.03 oz)
- Sulfuric acid (50%) – 100 cm3 (3.4 fl oz)
Sodium hypochlorite is widely available and can be obtained from household chlorine-based bleach. The best options are the cheapest brands, as they contain fewer additives.
Urea, also known as carbamide, is an organic compound with critical applications in biology and chemistry. It is a key metabolic byproduct in living organisms and is widely used in the chemical, agricultural, and pharmaceutical industries. In agriculture, it serves as a nitrogen fertilizer, while in medicine, it is used for diagnostics and skincare applications.
To begin the synthesis, cool 500 cm3 (17 fl oz) of sodium hypochlorite solution in a large container. The best way to do this is by placing the container in an ice bath, as the first step of the reaction requires maintaining a temperature close to 8°C (46°F) (Photo 12).

It is important to use a container with a capacity significantly larger than the volume of the liquid, as the reaction can cause considerable foaming.
Next, while continuously stirring, slowly add 32 g (1.1 oz) of sodium hydroxide in small portions, ensuring that the temperature remains within the specified range. The temperature should never exceed 10–15°C (50–59°F), as this would lead to rapid decomposition of the hypochlorite.
Prepare two separate solutions:
- 0.75 g (0.03 oz) of gelatin dissolved in 15–18 cm3 (0.5–0.6 fl oz) of distilled water
- 22 g (0.8 oz) of urea dissolved in 40 cm3 (1.4 fl oz) of distilled water
In both cases, complete dissolution may require slight heating. Once fully dissolved, combine both solutions and allow them to cool slightly.
Remove the ice bath and pour the entire volume of the cooled urea-gelatin solution into the hypochlorite solution all at once, then cover the container. However, vigorous stirring is essential, making a magnetic stirrer the ideal tool for this step. The solution will turn yellowish and become turbid; this is accompanied by the release of significant amounts of gas.
At this stage, a highly interesting reaction occurs: the Hofmann rearrangement. This chemical transformation converts primary amides into primary amines with a carbon chain reduced by one carbon atom, while simultaneously releasing carbon dioxide (CO2) [9] [10]. Covering the container is crucial, and the reaction should be carried out under a fume hood or outdoors due to the release of small amounts of hydrazine vapor.
The role of gelatin in this reaction is particularly noteworthy. The Hofmann rearrangement is highly sensitive to contamination by metal ions. These must be effectively sequestered, which is typically achieved using complexing agents such as ethylenediaminetetraacetic acid (EDTA, C10H16N2O8) and its salts. However, gelatin possesses similar properties and is sufficient for this application.
Continue stirring the solution until the gas evolution slows significantly. Then, heat the mixture to 85°C (185°F) for five minutes. Due to the reduced solubility of gas in warm liquids, residual carbon dioxide escapes from the solution (Photo 13).

Next, allow the solution to cool to room temperature, then further chill it to 0°C (32°F). Slowly, drop by drop (starting very cautiously and gradually increasing the rate), add the entire volume of sulfuric acid. This must be done carefully, as gas is released and significant foaming occurs. Initially, the acid neutralizes any remaining sodium hydroxide and sodium carbonate, then converts free hydrazine into its salt. As the solution is cooled, white crystals of hydrazine sulfate (N2H6SO4) precipitate (Photo 14).

The crystals are filtered, washed with a small amount of ice-cold water, and left to dry at room temperature. The product may be contaminated with a small amount of sodium sulfate (Na2SO4), but due to the similar solubilities of both compounds, there is no simple method for further purification. However, this will not interfere with subsequent synthesis steps.
I obtained 23 g (0.8 oz) of hydrazine sulfate, which corresponds to a 47.7% yield based on the starting materials. The product should be stored in dry conditions, away from light.
Stage IIb – Synthesis of Sodium Acetate
The next compound required for further synthesis is sodium acetate. This is a salt of acetic acid and sodium, with the chemical formula CH3COONa. It is widely used in industry and even in household applications. Due to its properties, it serves as a preservative and pH regulator. In the food industry, sodium acetate helps maintain the freshness and shelf life of various products, such as pickles, canned goods, and vegetable preserves. It is also used in the textile, leather, and paper industries, making it a versatile compound with applications in both industry and daily life.
Sodium acetate is readily available and inexpensive, but it can also be synthesized using two common household substances:
- White vinegar (acetic acid CH3COOH, 6–10%)
- Baking soda (sodium bicarbonate NaHCO3)
Instead of vinegar, concentrated acetic acid (70–80%) can be used, which is even more effective.
In a large container (to account for foaming), pour 0.5 dm3 (17 fl oz) of vinegar, then gradually add baking soda while stirring. Continue adding until gas evolution ceases. This reaction neutralizes the acetic acid, forming sodium acetate. The solution is then evaporated until it becomes cloudy and white crystals begin to form (Photo 15).

At this point, continue heating while adding enough water to dissolve all the crystals. This produces a clear solution, which is then hot-filtered into a clean container, covered, and left to cool.
An interesting phenomenon occurs during this process. A clear, supersaturated solution of sodium acetate can be cooled below its normal crystallization point without solidifying. This creates a supercooled liquid, which can remain in this metastable state until crystallization is triggered, for example, by introducing a seed crystal (Photo 16A).

A – Seeding the solution with a small sodium acetate crystal (0s),
B – Crystallization begins (2s),
C – Entire solution has crystallized (5s)
This results in a very rapid crystallization process, where the solid phase propagates visibly through the solution (Photo 16B), transforming the entire liquid into a solid mass within seconds (Photo 16C). This phenomenon is both visually striking and scientifically significant. Additionally, heat is released during crystallization, which is exploited in reusable hand warmers.
The crystallized sodium acetate can be crushed, dried, and used in further experiments (Photo 17). The reaction yield exceeds 90%.

Stage III – From 3-Nitrophthalic Acid to 3-Nitrophthalhydrazide
At this stage, the key substances required are:
- 3-Nitrophthalic acid – 13 g (0.5 oz)
- Hydrazine sulfate – 13 g (0.5 oz)
- Sodium acetate trihydrate – 13 g (0.5 oz)
- Glycerol (glycerin) – 65 cm3 (2.2 fl oz)
Glycerol (C3H8O3) is a simple sugar alcohol and the smallest stable trihydroxy alcohol (triol). Under normal conditions, it is a colorless, viscous, and highly hygroscopic liquid. Glycerol has a wide range of applications, from chemical synthesis to use as a solvent and even in the food industry.
In a glass container, place all solid reagents and dissolve them in 52 cm3 (1.8 fl oz) of distilled water. At room temperature, the substances do not dissolve completely, forming a white suspension (Photo 18).

Heat the mixture gently while stirring continuously until all solids dissolve, producing a yellowish, clear liquid. Once the solution is prepared, add the required volume of glycerol (with minimal water content). The resulting viscous yellow solution (Photo 19) must be thoroughly mixed before proceeding with heating.

Why is glycerol used in this reaction? The condensation of hydrazine (released in situ from its sulfate salt) with 3-nitrophthalic acid proceeds efficiently only at temperatures significantly higher than what can be reached in an aqueous solution under normal pressure. Thus, glycerol serves as a high-boiling reaction medium. However, before the reaction can proceed efficiently, most of the water must be removed. As heating continues, at 100–120°C (212–248°F), significant foaming occurs due to the evaporation of water. Once all water is removed, the temperature rises rapidly. Our goal is to maintain the temperature between 200–220°C (392–428°F) for five minutes. Avoid overheating, as this may cause product degradation. During this stage, a large amount of yellow or even orange precipitate forms (Photo 20).

After the specified heating time, stop heating and allow the reaction mixture to cool to a few dozen degrees Celsius (a few hundred degrees Fahrenheit). Then, while stirring, add approximately 200 cm3 (6.8 fl oz) of distilled water. The solid product is filtered, washed several times with cold water to remove soluble impurities, and then dried. The resulting 3-nitrophthalhydrazide (C8H5N3O4) appears as a yellowish, amorphous powder (Photo 21). Its structural formula is shown in Figure 5.


I obtained 9.62 g (0.34 oz) of 3-nitrophthalhydrazide, corresponding to a yield of 76% based on the nitrophthalic acid used.
Stage IIIa – Thiourea Dioxide
The next step requires a reducing agent to convert 3-nitrophthalhydrazide into 3-aminophthalhydrazide. Many substances can serve this purpose, such as tin(II) chloride (SnCl2) or sodium dithionite (Na2S2O4). However, an interesting alternative is thiourea dioxide (CH4N2O2S), which unusually acts as a reducing agent even though it is synthesized via oxidation.
To synthesize thiourea dioxide, we need:
- Thiourea (CH4N2S) – 20 g (0.7 oz)
- Hydrogen peroxide (H2O2, 30%) – 67 cm3 (2.3 fl oz)
Place the entire volume of hydrogen peroxide into a metal (e.g., aluminum) container, set it in a cooling bath containing an ice-salt mixture, and place it on a magnetic stirrer (Photo 22A).

A – Chilled hydrogen peroxide,
B – Formation of the white product
Now, very slowly add small portions of thiourea to the solution. This reaction is extremely exothermic, and above 20°C (68°F), it can become nearly explosive. Therefore, efficient heat dissipation is crucial. What happens if proper cooling is not maintained? The answer is shown in Photo 23 (and in the attached video). Even with a small amount of reactants, the mixture begins to violently boil as soon as thiourea contacts the oxidizer, causing the hot, highly corrosive liquid to splash everywhere. With intensive cooling (below 20°C or 68°F), slow thiourea addition, and vigorous stirring, the reaction proceeds smoothly [11].

A – 5 cm3 (0.2 fl oz) of 30% hydrogen peroxide in a beaker,
B – After adding thiourea, visible violent boiling and liquid splattering
As thiourea is gradually added, white solid particles begin to precipitate from the solution (Photo 22B). After the entire quantity has been added, continue stirring for another 30 minutes. Then, filter the precipitate, wash it with a small amount of cold water, dry it, and store it in a dark place.
I obtained 20.4 g (0.7 oz) of thiourea dioxide, which corresponds to approximately 76% of the theoretical yield.
Stage IV – From 3-Nitrophthalhydrazide to 3-Aminophthalhydrazide (Luminol)
The final step in the synthesis is the reduction of the nitro (-NO2) group in 3-nitrophthalhydrazide to an amine (-NH2), which will yield luminol. To proceed, we need:
- 3-Nitrophthalhydrazide – 9.6 g (0.34 oz)
- Thiourea dioxide – 20.1 g (0.71 oz)
First, dissolve the 3-nitrophthalhydrazide in 105 cm3 (3.5 fl oz) of ammonia solution (NH3(aq), 4.5M). This produces a deep red solution (Photo 24).

Next, while stirring vigorously, slowly add the thiourea dioxide to the solution. The mixture will warm slightly, and the red color will fade (Photo 25). At this point, significant amounts of ammonia gas are released, so the reaction must be carried out under a fume hood or outdoors.

After the entire reducing agent has been added, heat the solution to 80–90°C (176–194°F) for 30 minutes to ensure complete reaction. Then, allow the solution to cool.
To precipitate the product, the solution must be neutralized and then carefully acidified using hydrochloric acid. This must be done gradually, adding small portions of acid while monitoring the reaction. If too much acid is added at once, the pH may drop too low, which is undesirable. When the correct pH is reached, a yellow precipitate of 3-aminophthalhydrazide (luminol) forms (Photo 26).

The solid is filtered and washed several times with distilled water. Due to its very low solubility in water, minimal losses occur during purification. The hydrazide can be further purified by recrystallization, but this is usually unnecessary, as the purity is sufficient for most applications. The final luminol product appears as a yellow powder (Photo 27).

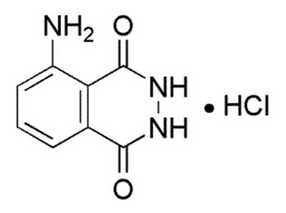
I obtained 5.4 g (0.19 oz) of 3-aminophthalhydrazide (luminol) in the form of its hydrochloride salt (C8H7N3O2·HCl), with a yield of 54% based on the 3-nitrophthalhydrazide used.
Luminol should be stored in a dark place to ensure long-term stability.
Chemiluminescence of Luminol
Luminol exhibits chemiluminescence in both aqueous and organic solvents, such as dimethylformamide (C3H7NO) and dimethyl sulfoxide (C2H6OS). The literature contains numerous procedures for exciting luminol's light emission in spectacular chemical reactions. To test the synthesized compound, I suggest using a simple reaction:
| A: | 0.2 g (0.007 oz) luminol and 3 g (0.1 oz) sodium hydroxide dissolved in 50 cm3 (1.7 fl oz) distilled water, with 5 cm3 (0.17 fl oz) of 3% hydrogen peroxide (pharmacy-grade) added just before the experiment. |
| B: | 0.5 g (0.02 oz) potassium ferricyanide (K3[Fe(CN)6]) dissolved in 10 cm3 (0.34 fl oz) distilled water. |
Upon mixing the two solutions, a bright blue glow appears, creating an impressive effect despite fading relatively quickly.

A – Luminol and oxidizer solution,
B – After mixing, visible blue light emission
The duration and intensity of the light emission depend on both the composition of the solutions and the solvent used.
Explanation
The chemiluminescence reaction proceeds through multiple steps. In an alkaline solution, luminol dissociates into a dianionic form. However, this process is not straightforward because keto-enol tautomerism occurs. During dissociation, two forms appear: a ketone form, where the negative charge is localized on nitrogen atoms, and an enol form, where the charge is on oxygen atoms. These forms exist in dynamic equilibrium, constantly interconverting, but only the enol form undergoes oxidation by hydrogen peroxide catalyzed by potassium ferricyanide.
The oxidation step produces a highly unstable cyclic peroxide, which quickly decomposes into molecular nitrogen N2 and an excited aminophthalate ion. This ion is energetically unstable and returns to its ground state by releasing excess energy as blue light, a process known as chemiluminescence.
Beyond its use in educational demonstrations, luminol has applications in forensic science for detecting blood traces at crime scenes, as well as in analytical chemistry.
References
- [1] Ples M., Blask w kolbie - synteza i chemiluminescencja lucygeniny (eng. Light in the flask - preparation and chemiluminescence of lucygenin), Chemia w Szkole (eng. Chemistry in School), 3 (2023), Agencja AS Józef Szewczyk, str. 44-50 powrót
- [2] Ples M., Fosfor - alchemiczne światło (eng. Phosphorus, the Light of Alchemy), Chemia w Szkole (eng. Chemistry in School), 2 (2019), Agencja AS Józef Szewczyk, str. 13-17 powrót
- [3] Ples M., Lofina - wielka synteza (eng. Lophine – The Great Synthesis), Chemia w Szkole (eng. Chemistry in School), 6 (2022), Agencja AS Józef Szewczyk, str. 43-50 powrót
- [4] Ples M., Co i jak można otrzymać z piasku? Nieznane oblicze krzemu (eng. What and How Can Be Obtained from Sand? The Unknown Face of Silicon), Chemia w Szkole (eng. Chemistry in School), 6 (2016), Agencja AS Józef Szewczyk, str. 38-43 powrót
- [5] Haynes W. M. (red.), CRC Handbook of Chemistry and Physics (wyd. 95), CRC Press, 2014, str. 3-18 powrót
- [6] Sheikh I. A., Stereoselectivity and the potential endocrine disrupting activity of di-(2-ethylhexyl)phthalate (DEHP) against human progesterone receptor: a computational perspective, Journal of applied toxicology, 36 (5), 2016, str. 741-747 powrót
- [7] Hassa R., Mrzigod J., Podręczny słownik chemiczny (eng. Handbook of Chemistry), Videograf II, Katowice, 2004, str. 167 powrót
- [8] Greenwood N. N., Earnshaw A., Chemistry of the elements, Pergamon Press, 1984, str. 427-428 powrót
- [9] Hofmann A. W., Ueber die Einwirkung des Broms in alkalischer Lösung auf Amide, Berichte der Deutschen Chemischen Gesellschaft, 14, 1881, str. 2725-2736 powrót
- [10] Wallis E. S., Lane J. F., The Hofmann Reaction, Organic Reactions, 3, 1949, str. 267-306 powrót
- [11] Pluciński T., Synteza luminolu (eng. Luminol preparation), dostępne online: http://www.tomek.strony.ug.edu.pl/syntezaluminolu.htm [dostęp 14.10.2023] powrót
All photographs and illustrations were created by the author.
Addendum
The chemiluminescence of luminol is such a spectacular phenomenon that it is worth incorporating into lessons to enhance the presentation of topics related to energy transformations at the molecular level.
A relatively unknown and rarely utilized effect is the energy transfer that occurs during luminol chemiluminescence to fluorescent dye molecules present in the solution, such as fluorescein (C20H12O5). In this case, the emitted light changes color to match the characteristic fluorescence of the added substance.

Interestingly, the oxidation reaction of luminol can also be catalyzed by compounds of other metals, such as copper Cu.

Additionally, luminol can be used as a chemiluminescent indicator in oscillating reactions.
Of course, these examples do not exhaust the possibilities of using luminol for educational and scientific purposes, so I encourage independent experiments and further exploration.
Marek Ples